 Questions? Questions?Read our FAQ or contact starpooh |

|
Finished Kitchens Blog (FKB) Home
Finished Kitchens Slideshow
Finished Backsplashes Slideshow
Inspirational Backsplashes
GardenWeb Kitchen Forum
GardenWeb Kitchen Forum Gallery
Kitchen Forum FAQ
FKB Categories
FKB FAQ
Protect your online photos
 Add your finished kitchen
to the FKB
Email starpooh to add your in-progress photos to the FKB abd1's Kitchen
- acomom's Kitchen
- AdoptedByGreyhounds' Kitchen
- adpi4's Kitchen
- aktillery's Kitchen
- alaskangirl's Kitchen
- alina_1's Kitchen
- alliern's Kitchen
- allison0704's Kitchen
- alwaysgolf's Kitchen
- amck's Kitchen
- AmySRQ's Kitchen
- andrea345's Kitchen
- Angc's Kitchen
- AnnaLeeF's Kitchen
- aprilquilts' Kitchen
- aptosca's Kitchen
- arbordomus' Kitchen
- arc1017's Kitchen
- arianaciara's Kitchen
- arin's Kitchen
- arlosmom's Kitchen
- ArtTeacher_NJ's Kitchen
- arvajuli's Kitchen
- atcsgame's Kitchen
- athomedad's Kitchen
- athomewith3's Kitchen
- auzzy's Kitchen
- aweinman's Kitchen
 awm03's Kitchen
- axxis_rose's Kitchen
- babs711's Kitchen
- bamaspice's Kitchen
- barb59's Kitchen
- barbarak1965's Kitchen
- baxawax's Kitchen
- beachlvr's Kitchen
- beatrix_in_canada's Kitchen
- becktheeng's Kitchen
- Beeswax18's Kitchen
- bella_4's Kitchen
- bemily's Kitchen
- berf's Kitchen
- bernice44's Kitchen
- berryberry's Kitchen
- Beth4's Kitchen
- bethohio3's Kitchen
- beths96's Kitchen
- bigdaddybondo's Kitchen
- billyc's Kitchen
- bikey's Kitchen
- bluebird_CA's Kitchen
- bluemoon2's Kitchen
- BoCRon's Kitchen
- boo_salbs's Kitchen
- Bosche's Kitchen
- bouquet's Kitchen
- bree_r's Kitchen
- Brenne's Kitchen
- bri29's Kitchen
- brody_miasmom's Kitchen
- brosamj's Kitchen
- brrrr_in_MN's Kitchen
- bruinjen93's Kitchen
- btrails4's Kitchen
- buckets' Kitchen
- buffettgirl's Kitchen
- Buglady_DE's Kitchen
- bunglogrl's Kitchen
- busterdawgsmom's Kitchen
- BusyMom2's Kitchen
- cabosgirl's Kitchen
- californiacook's Kitchen
- callieandkarin's Kitchen
- camargo's Kitchen
- cangelmd's Kitchen
- caralann's Kitchen
- caroleoh's Kitchen
- caroline_d's Kitchen
- carolpolki's Kitchen
- cat_mom's Kitchen
- catb's Kitchen
- cate_co's Kitchen
- catslikemice's Kitchen
- cburch's Kitchen
- cdecker1's Kitchen
- cdeenen's Kitchen
- cephillips' Kitchen
- chardon's Kitchen
- charles123's Kitchen
- charlie123's Kitchen
- Cheryl444's Kitchen
- CherylAP's Kitchen
- chinkle's Kitchen
- chmpgntst's Kitchen
- chrispmoto's Kitchen
- cindylou2006's Kitchen
- Cisling's Kitchen
- Claire_De_Luna's Kitchen
- claudia_nj's Kitchen
- cliff_and_joann's Kitchen
- cml1's Kitchen
- codex77's Kitchen
- coleen3201118's Kitchen
- Colo_Lady's Kitchen
- compumom's Kitchen
- Coppergirl's Kitchen
- corgilvr's Kitchen
- corgimom_2006's Kitchen
- cpang74's Kitchen
- cubby14's Kitchen
- daki's Kitchen
- dalerb66's Kitchen
- danielle00's Kitchen
- Danni_in_PDX's Kitchen
- davetz1's Kitchen
- dcb1_2008's Kitchen
- dccnm's Kitchen
- dcmarvel's Kitchen
- deanna1949's Kitchen
- deanne3899's Kitchen
- debbick's Kitchen
- debdy's Kitchen
- Decor_Diva's Kitchen
- deenoel's Kitchen
- delmobile's Kitchen
- devi's Kitchen
- dfw17's Kitchen
- Diane2566's Kitchen
- DianneN's Kitchen
- Dinadazz' Kitchen
- dinobambino's Kitchen
- diykitchen's Kitchen
- dlosapio's Kitchen
- dlundin's Kitchen
- dmank's Kitchen
- dmsb's Kitchen
- DoggieMom's Kitchen
- donnakay2009's Kitchen
- Donna_NJ's Kitchen
- dougnmallie's Kitchen
- downsy's Kitchen
- downtowner's Kitchen
- drchuck's Kitchen
- drewb's Kitchen
- drjay71's Kitchen
- drmeow3's Kitchen
- Dylemma's Kitchen
- Ebang's Kitchen
- EBird's Kitchen
- ECFamily's Kitchen
- ecoleman251's Kitchen
- eelliott's Kitchen
- eieioio's Kitchen
- Eileen3G's Kitchen
- ekj33's Kitchen
- Elizabeth_B's Kitchen
- elizpiz' Kitchen
- elljays' Kitchen
- emiceekayeewhy's Kitchen
- emma47's Kitchen
- english8's Kitchen
- epg26's Kitchen
- epjenk's Kitchen
- eriepatch's Kitchen
- evan_nj's Kitchen
- evaperconti's Kitchen
- evergreendan's Kitchen
- expobaby's Kitchen
- Fairegold's Kitchen
- faithab's Kitchen
- farmhousebound's Kitchen
- femmelady's Kitchen
- flash407's Kitchen
- foreverremodel's Kitchen
- Forkfriend's Kitchen
- formosalily's Kitchen
- franki1962's Kitchen
- frenchkitty's Kitchen
- funkykeys1's Kitchen
- Gail2's Kitchen
- gam51's Kitchen
- Garden_Graphic_Gal's Kitchen
- Gary64's Kitchen
- gellchom's Kitchen
- Georgie71's Kitchen
- geogirl1's Kitchen
- gglks' Kitchen
- Gibby3000's Kitchen
- GiftedBasket's Kitchen
- gina_w's Kitchen
- ginmtb's Kitchen
- girlwithaspirin's Kitchen
- glad's Kitchen
- glycera's Kitchen
- goffgirl's Kitchen
- goojie's Kitchen
- gracesantacruz' Kitchen
- grant13's Kitchen
- grendal_fly's Kitchen
- greystone's Kitchen
- groschuni's Kitchen
- gumtree's Kitchen
- hana_b's Kitchen
- happytime_ca's Kitchen
- hausfrau_auf_dem_see's Kitchen
- hddana's Kitchen
- hedygs' Kitchen
- henrysmom's Kitchen
- hest88's Kitchen
- hiltonc's Kitchen
- hmdennis' Kitchen
- hmg58's Kitchen
- hmsweethm's Kitchen
- hobokenkitchen's Kitchen
- hobokenkitchen's Kitchen#2
- hoffman's Kitchen
- hollybolly's Kitchen
- hollylh's Kitchen
- honeyb2's Kitchen
- honeydiy's Kitchen
- housewitch's Kitchen
- house_vixen's Kitchen
- hsorrentino's Kitchen
- ivorykay's Kitchen
- jabbahop's Kitchen
- jacobse's Kitchen
- Jamesk's Kitchen
- janedibber's Kitchen
- janefan's Kitchen
- janellemiller's Kitchen
- jassoph's Kitchen
- jaymielo's Kitchen
- jbugz' Kitchen
- jcblancha's Kitchen
- jcthorne's Kitchen
- jeanar's Kitchen
- Jecca's Kitchen
- jejvtr's Kitchen
- jeniferkey's Kitchen
- JennG's Kitchen
- jenniferh66's Kitchen
- jennyandretti's Kitchen
- jennybeth's Kitchen
- JensKitchen's Kitchen
- jenswrens' Kitchen
- jerzeegirl's Kitchen
- jetlagged's Kitchen
- jgarner53's Kitchen
- Jill_77's Kitchen
- jjcpink01's Kitchen
- jkpita's Kitchen
- jmhsc's Kitchen
- Joang_CA's Kitchen
- joanneva12a's Kitchen
- joanp's Kitchen
- Jodie_B's Kitchen
- Joiful's Kitchen
- jojoco's Kitchen
- jonibook's Kitchen
- jordanl's Kitchen
- joy910's Kitchen
- joycedc's Kitchen
- joynserf's Kitchen
- JOY_OR's Kitchen
- jquentzel's Kitchen
- jraz_wa's Kitchen
- jtsgranite4us' Kitchen
- julie7549's Kitchen
- JulieP's Kitchen
- julier1234's Kitchen
- julie_sd's Kitchen
- justadncr's Kitchen
- Kacee2002's Kitchen
- KansasKathy's Kitchen
- karalouise's Kitchen
- karenforroses' Kitchen
- karenmaraj's Kitchen
- Katalina's Kitchen
- katnip9's Kitchen
- KatScrapper's Kitchen
- KellyFG's Kitchen
- keriwest's Kitchen
- ketinmd's Kitchen
- kevin1727's Kitchen
- kevsea's Kitchen
- kew2006's Kitchen
- kgsmom's Kitchen
- kimmers71's Kitchen
- kimmieb's Kitchen
- kitchenkelly's Kitchen
- KitchenKrazed's Kitchen
- kmbmommy's Kitchen
- kmickleson's Kitchen
- knroberts' Kitchen
- Kompy's Showroom Kitchen
- kophiphi's Kitchen
- kpekitchen's Kitchen
- kpirnia's Kitchen
- kristen82's Kitchen
- kristi's Kitchen
- kszal's Kitchen
- ktdid16's Kitchen
- labordeliverynurse's Kitchen
- larice's Kitchen
- lanugget's Kitchen
- lasocal's Kitchen
- laur912's Kitchen
- lauraella's Kitchen
- Laurie_SJC's Kitchen
- leahgillum's Kitchen
- legallin's Kitchen
- lemonade's Kitchen
- lgb25's Kitchen
- lindjake's Kitchen
- lindybarts' Kitchen
- lisa1's Kitchen
- Lispeth's Kitchen
- lissa711's Kitchen
- littlebitofheaven's Kitchen
- lleet's Kitchen
- lmychajluk's Kitchen
- lnersesian's Kitchen
- lois418's Kitchen
- loriafopiano's Kitchen
- lorinscott_1's Kitchen
- lovemyboys' Kitchen
- loves2cook4six's Kitchen
- lowspark's Kitchen
- luceestar's Kitchen
- lucia27's Kitchen
- lvmadison's Kitchen
- lynndr's Kitchen
- lynninnewmexico's Kitchen
- lzydogrnch's Kitchen
- mackswim's Kitchen
- maconiteasy's Kitchen
- Mahnrut's Kitchen
- MaiaA's Kitchen
- maidielou's Kitchen
- mamadadapaige's Kitchen
- mamalynn's Kitchen
- mandysbaba's Kitchen
- manicotti's Kitchen
- marciab10's Kitchen
- marita40's Kitchen
- markbr's Kitchen
- marty_2008's Kitchen
- mary_in_nc's Kitchen
- mary_228's Kitchen
- MaryLynnNC's Kitchen
- marybeth1's Kitchen
- MaryMT's Kitchen
- mayaswell's Kitchen
- maydl's Kitchen
- mdmc's Kitchen
- Meadow_MD's Kitchen
- measure_twice's Kitchen
- melinrk's Kitchen
- Melis918's Kitchen
- melnnoa's Kitchen
- Mercymygft's Kitchen
- meskauskas' Kitchen
- mfrog's Kitchen
- michoumonster's Kitchen
- mickeymammoth's Kitchen
- mickeynick's Kitchen
- micklessor's Kitchen
- mike7142's Kitchen
- mimi_2006's Kitchen
- minac's Kitchen
- mindstorm's Kitchen
- mir3899's Kitchen
- missourimomtotwo's Kitchen
- mistybear11's Kitchen
- Mizzou_KX's Kitchen
- mjs11's Kitchen
- mjt7397's Kitchen
- mlaj2000's Kitchen
- mnhockeymom's Kitchen
- MollyB2's Kitchen
- momj47's Kitchen
- momofboys3's Kitchen
- momof3kids_pa's Kitchen
- Momto4Kids' Kitchen
- mongon's Kitchen
- Monicakm's Kitchen
- monkeyjac's Kitchen
- montalvo's Kitchen
- Moogies' Kitchen
- morton5's Kitchen
- Mother_One's Kitchen
- mountainbasketmaker's Kitchen
- mpsteil's Kitchen
- mrao77's Kitchen
- mrblandings' Kitchen
- mrsmarv's Kitchen
- MsAzadi's Kitchen
- mstargardener1's Kitchen
- murfy721's Kitchen
- mwardlb's Kitchen
- mwlhrh's Kitchen
- mythreegirls' Kitchen
- Nadine33's Kitchen
- NancyA's Kitchen
- Nancy_in_Mich's Kitchen
- natashak's Kitchen
- natenvalsmom's Kitchen
- nats-md's Kitchen
- ncl520's Kitchen
- ndvweb's Kitchen
- needanap's Kitchen
- neumamom's Kitchen
- nfkura's Kitchen
- Nicole__'s Kitchen
- Nikki_NJ's Kitchen
- niknak99's Kitchen
- njd1227's Kitchen
- njmomof2's Kitchen
- nodirthere's Kitchen
- nokeysyet's Kitchen
- NorCalNancy's Kitchen
- november's Kitchen
- ntt_hou's Kitchen
- nymommy's Kitchen
- ohiokelly's Kitchen
- ontfolks' Kitchen
- ophiemom's Kitchen
- orchidluvr's Kitchen
- organic_donna's Kitchen
- oshnwavz's Kitchen
- outwest's Kitchen
- ovenbird's Kitchen
- p3shawn2's Kitchen
- pabiabi's Kitchen
- paco6945's Kitchen
- paddytc's Kitchen
- paigeysmom's Kitchen
- pamghatten's Kitchen
- Pammo's Kitchen
- patti_bee's Kitchen
- paulines' Kitchen
- pbrain's Kitchen
- pdxliz' Kitchen
- pegkip's Kitchen
- pharaoh's Kitchen
- pinch_me's Kitchen
- pirula's Kitchen
- pjsluna's Kitchen
- pkirkha1's Kitchen
- prairiestyle's Kitchen
- prettykitty1971's Kitchen
- proudmamato4's Kitchen
- pruella's Kitchen
- Pwdrhdut's Kitchen
- rachelrachel's Kitchen
- ranchreno's Kitchen
- randgalt's Kitchen
- RebeccaW's Kitchen
- redbazel's Kitchen
- redrange's Kitchen
- redroze's Kitchen
- reno_fan's Kitchen
- revans1's Kitchen
- Rice_Rocket's Kitchen
- richard_remodels' Kitchen
- ricklish's Kitchen
- Rima_WA's Kitchen
- riverrat1's Kitchen
- rmkitchen's Kitchen
- robinst's Kitchen
- rococogurl's Kitchen
- rose2273's Kitchen
- ross11's Kitchen
- Rosyjennifer's Kitchen
- rotag's Kitchen
- rthornto's Kitchen
- rtpaisley's Kitchen
- ruemom's Kitchen
- ryker's Kitchen
- sage63's Kitchen
- salbwil's Kitchen
- salmon_slayer's Kitchen
- Sam_I_Am's Kitchen
- Samanthap's Kitchen
- sancerre's Kitchen
- sarapamela's Kitchen
- sarina's Kitchen
- sassyMNmom's Kitchen
- saydiver's Kitchen
- scottielee's Kitchen
- scotty_boy's Kitchen
- scrapbookone's Kitchen
- seeking_advice's Kitchen
- segbrown's Kitchen
- sergeyp's Kitchen
- sewanhakagirl's Kitchen
- shanbr's Kitchen
- sharb's Kitchen
- Sharon_G_in_Ma's Kitchen
- sheba1895's Kitchen
- sherrilea's Kitchen
- Shroppie's Kitchen
- siamese3's Kitchen
- sippy_south's Kitchen
- sienne_c's Kitchen
- sixdykstras' Kitchen
- SKennedy0421's Kitchen
- skivino's Kitchen
- slc2053's Kitchen
- smbnobles' Kitchen
- smooya's Kitchen
- snookums' Kitchen
- snowbaby's Kitchen
- socabeth's Kitchen
- socal_ann's Kitchen
- socalthreem's Kitchen
- soigne's Kitchen
- soofriver's Kitchen
- soonermagic's Kitchen
- soovhappy's Kitchen
- soupgirl's Kitchen
- souprqt's Kitchen
- southernstitcher's Kitchen
- spacific's Kitchen
- sscutchen's Kitchen
- Steve_A's Kitchen
- stiles' Kitchen
- stillg10's Kitchen
- stovegirl's Kitchen
- sue_b's Kitchen
- sue7972's Kitchen
- sugarbreak's Kitchen
- sundial's Kitchen
- sundownr's Kitchen
- SunRochy's Kitchen
- susan4664's Kitchen
- susanandmarkw's Kitchen
- suse17's Kitchen
- sushraya's Kitchen
- susulo's Kitchen
- susytwo's Kitchen
- Sutton's Kitchen
- suzatwork's Kitchen
- Sweeby's Kitchen
- swissmiss' Kitchen
- sw_in_austin's Kitchen
- tammyct's Kitchen
- TanyaL's Kitchen
- teambrogdon's Kitchen
- Teddi_and_Roger's Kitchen
- teelag's Kitchen
- teppy's Kitchen
- teresa518's Kitchen
- terriks' Kitchen
- texashottie's Kitchen
- theanimala's Kitchen
- TheCabinetMaker's Kitchen
- the_endless_kitchen's Kitchen
- theresab1's Kitchen
- thull's Kitchen
- tinylady's Kitchen
- tiskers' Kitchen
- tito's Kitchen
- tobler's Kitchen
- tofu_dog's Kitchen
- TommeCA's Kitchen
- tonilynne's Kitchen
- toomuchremodeling's Kitchen
- traci29's Kitchen
- trailrunner's Kitchen
- trekker's Kitchen
- Triscuit's Kitchen
- ttfweb's Kitchen
- tuckturn's Kitchen
- tussymussy's Kitchen
- twochicklets' Kitchen
- twor's Kitchen
- TxRunner's Kitchen
- tyrak's Kitchen
- u2kelly's Kitchen
- URSpider's Kitchen
- uxorial's Kitchen
- valincal's Kitchen
- vasheri's Kitchen
- vatmark's Kitchen
- vedaZu's Kitchen
- vince25's Kitchen
- VivR's Kitchen
- vjrnts' Kitchen
- vwhippiechick's Kitchen
- wanabchef's ktchen
- wantakitchen's ktchen
- warren's Kitchen
- wascolette's Kitchen
- weedyacres' Kitchen
- weed30's Kitchen
- weegie's Kitchen
- weissman's Kitchen
- whitevenetino's Kitchen
- whoooooooooosh's Kitchen
- willie_nunez' Kitchen
- wilsonb's Kitchen
- windlassie's Kitchen
- wonbyherwits' Kitchen
- write4rx's Kitchen
- yadax3's Kitchen
- yanalg's Kitchen
- yesdear's Kitchen
- yolande_1951's Kitchen
- youngdeb's Kitchen
- yvette123's Kitchen
- zanthe's Kitchen
- zaron's Kitchen
- zenpotter's Kitchen
- zolablue's Kitchen
- zshopper's Kitchen
- Zzz2005's Kitchen
Other GardenWeb member blogs

Best viewed with a display setting of at least 1024x768 pixels.

joynserf's Kitchen
joynserf's finished kitchen
by joynserf (My Page) on Wed, Mar 24, 04
link to kitchen: http://www.photoaccess.com/share/guest.jsp?ID=AB773D29D7C&cb=PA
Details:
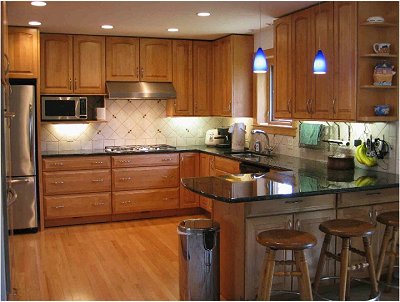
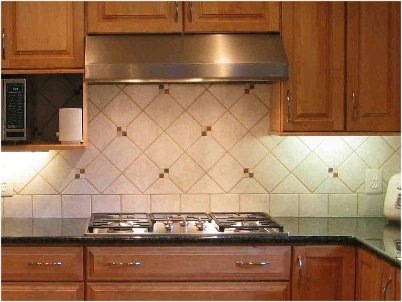
 Cabinets: Kraftmaid Piermont Cathedral Honey Spice Maple from HD with all full-extension drawers and APC (All Plywood Construction)
- Verde Butterfly Granite Countertop
- Tembec Muskoka Red Oak Clear Hardwood Floors
- Kitchenaid 30" Architect Series Double Convection Oven (KEBC208KSS)
- Kitchenaid 4" console dishwasher (KUDS01IJBS)
- Amana Bottom Freezer EasyReach (ARB2217CSL)
- Miele MasterChef 36" Five Burner Gas Cooktop
- Vent-a-Hood NPH9-236-SS
- Panasonic Convection Microwave (NN-T888S)
- Grohe Ladylux Plus in SS
- Grohe Deluxe Soap Dispenser
- Elkay Single Bowl Undermount Sink with Reveal (ELUH2816)
- Porcelain Tile Backsplash
- Slim fluorescent undercabinet lights
- Brush nickel 128mm pulls

Neat Features learned only from this GREAT forum:
- Tapmaster – hands-free faucet activation
- Hafele Folding Toekick Step Stool
- Hafele Pull-Out door Opener with a tap of the foot
- Toekick drawers
- Lifeliner – drawer/shelf liners
We’ve been at it for a year now. Demolition started during the blizzard of 2003. Gutted everything and tore down a wall. I can say that it’s 99% done. All DIY except wood floors which we had a friend’s floor guy put in and the brickwork involved in closing in the exterior door in the kitchen. The total cost of the renovation is close to 22K.
Made DH build the trashcan pullout and the toekick drawers after hearing about it from here. He wasn’t too happy that I came up with more work for him and told me not to read the forum but now he’s thrill with it and shows it off whenever possible. We used the Accuride drawer slides with overtravel. These are some great slides. Incidentally, these slides are also from Hafele. They do have some great products.
Neat feature that didn’t get incorporated:
Plugmold - Found out about it too late and DH was not about to redo all the electrical again.
Neat Ideas for extra doors/parts for the cabinets due to bad workmanship:
Cut the edge of the doors and use it for moulding for the bottom of the wall cabinets, which keeps the undercabinet lights from view.
Build a microwave shelf.
Follow-Up Postings:
RE: joynserf's finished kitchen
- Posted by: joynserf (My Page) on Wed, Mar 24, 04 at 2:22
This is a follow-up to Joy’s post of our kitchen. This is the DIY portion of the kitchen renovation.
Some initial points:
- This is being written by the DH who is an engineering geek. (I am told one translation is Dear Husband and I’ll stick to that).
- Although I did tell my wife to stop reading this news group, it has provided a number of very useful ideas that have been incorporated into our kitchen. Thank you to all who posted their kitchens and research.
- My wife did all of the research for the kitchen, ordered all of the items, and coordinated the four sub-contractors that did a small portion of the renovations (granite counters, brick work to move door, window install, wood floor). Also, if one is capable of the DIY renovations done for this kitchen, then one could also do the window and floors. See Joy’s post listing the items used in the renovation.
- Renovation took 1 year, 6 months without a functioning kitchen.
- A working sink during the renovation is a "must". We left the sink cabinet in place and hacked the counter off about 1 foot on either side. Several times I needed to take the temporary sink out and then reinstall it.
- Take pictures of everything in the walls before you close up so you know were everything is routed.
Here is a list of most of the items done for our renovation:
Remove Dining room wall – This was a non-load bearing wall so structurally, no modifications were needed. However, make sure you don’t cut any electrical wires in your zeal to use your new reciprocating saw. We needed to re-route the phone line and electrical wiring that was in the wall.
Remove back door, close opening, insulate, and make a new wall flush with existing kitchen wall. Our house is brick and block construction so I needed to fill in thicker than just 2x4s.
Remove all cabinets – We saved these and used a number of them on the wall above the washer/dryer. Our daughter also uses one in her play kitchen.
Remove existing soffits – We ran the cabinets to the ceiling to maximize cabinet space.
Remove back and side walls to expose the studs and electrical wiring – Note, I have generally found that it is easier to just rip everything out for good access, and then put back new sheet rock. However, in my case I have an early form of very thick and hard wall board with a plaster skim coat. So I did not want to remove the ceiling since the two standard sheet rock sizes would not be as thick and I would have a problem joining the kitchen and dining room ceilings.
Remove vinyl floor and underlayment
Remove stove vent – This was routed through a wall and the joints leaked causing the kitchen odors to get into the basement. Also, the route had two 90 degree turns with decreases air flow and makes more turbulence and noise. We installed an 8 inch diameter vent straight up through the cabinet and out the roof.
Remove all the electrical wiring
Install new electrical wiring to current NEC (National Electric Code) and local jurisdiction requirements. In addition, I upped all wiring to 12 gauge which is rated for 20 Amps (vise 14 gauge rated for 15 Amps). In my case, I put in the following
- two GFI 20 Amp circuits for counter outlets for appliances
- 20 Amp circuit for microwave
- 20 Amp circuit for fridge
- 20 Amp circuit for stove igniter, stove vent, outlet over stove in cabinet for under counter lights and possible cabinet mounted radio/CD player. Also, it is nice to have two different circuits for the lights in a room when one is doing electrical work.
- 20 Amp circuit for lights
- 20 Amp circuit for dishwasher
- 20 Amp circuit for garbage disposal
- 20 Amp circuit for future deck (while we were doing exterior brick work)
- 40 Amp circuit for double oven
Install recessed lighting & peninsula pendant lighting
Install wiring for under counter lights – This will be fed from an outlet in the cabinet above the stove. Pre-ran wires to bottom of each cabinet. However, I did not put in a wall switch when I tiled since I originally planned to use one of the small touch sensitive switches with puck halogen lights. Thus I used a remote control RF switch on the outlet.
Install phone, CAT5 cable for hardwired network capability, speaker wire for deck (runs from living room down into basement, then up exterior wall of kitchen and into attic)
Install gas to stove
Install new plumbing cutoffs – We used 90 degree cutoffs. They last much longer and have very positive shut off. They are only a few dollars more than the typical cutoff valves that like to freeze up if they are not turned on/off once a year. Take into account how it will fit into sink cabinet with the garbage disposal and cutoff valve handles for turning. It was a tight fit with plumbing, garbage disposal, faucet with pullout (requires hose in cabinet to pull out), hands-free faucet control, hands free garbage can drawer.
Insulate
Install wall material – I used 3 / 4 inch plywood. This gave me more latitude in where I could put screws to hold the cabinets to the walls. However, I still tried to screw to studs also. Mark the wall material so you know were the studs are for screwing to.
Install upper wall cabinets – Do this before the floor, and there is one less set of things you can potentially drop on the new floor. Make sure you find the lowest point on your ceiling as your reference to set the top of the wall cabinets. Then use 2x4s set at the lower edge of the wall cabinets and screwed to the wall to assist in wall cabinet installation. You then have a level reference that you can place the cabinets on as you screw them to the wall.
Install A/C heating vent – re-route vent from wall which would be blocked by pantry cabinet to come up through floor and out pantry cabinet toe kick.
Install floor – Screw down all the underlayment and sand off any high spots. We installed tongue and groove pre-finished wood floors. We ran the floor from wall to wall going under the cabinets. We put the short wood pieces under the cabinets. This made installation of the dishwasher easier. Otherwise, there is the potential that the floor thickness could cause the gap between the floor and the counter top to be to short to slide in the dishwasher.
Build and install toe kick drawers – For additional storage of otherwise unusable space. I build drawer boxes, removed the toe kick front, mounted the drawers on over-extending rails to allow clearing the toe kick overhang, and reinstalled the toe kick as front of drawer.
Install step ladder in toe kick – This has proven to be a very useful item in a convenient location.
Install lower cabinets – Find the highest point on the floor and use that as the reference for the bottom of the cabinets. This is opposite that of the upper wall cabinets.
Install toe kick molding
Install foot activated sliding garbage can cabinet – This has also proven to be very useful since it is under the sink and does not require any hands to open or close (we use our knee to push it shut). See pictures
Cut opening for double oven in cabinet – This required both cutting a very expensive cabinet. Then installing a platform to set the oven on.
Install full height oven and pantry cabinet – For us, the toe kick was separate from the cabinet. However, since one needs to tilt a cabinet up to a vertical position one needs a higher ceiling than the cabinet height (less the separate toe kick). In our case the cabinet that would reach to ceiling was in fact about 1 / 2 inch to tall. Instead of going to a cabinet 4 inches smaller, we cut the toe kick down 1 /2 inch.
Install oven
Install stove hood and vent – Note, we tried to find the thinnest (least height) hood to minimize cabinet space loss which still had good performance (high cfm). I also wanted a cabinet over the hood that was functional. The vent was the straightest shortest run possible to maximize airflow and minimize noise. Our vent runs straight up through the cabinet and roof a total of about 8 feet.
Install custom build microwave shelf – Kraftmaid did not have a microwave shelf for the width cabinet we wanted, so I build one from the spare doors that were replaced due to damage or workmanship issues.
Install sink – In our case, to get the under counter sink we wanted and the cabinets to fit the room, we actually needed to knotch the cabinet sink. That is the sink is as wide as the cabinet. So it needed to be installed before the counter top. Should we ever need to change it, we will likely need to cut out the entire right side panel that faces the dishwasher.
Install counters
Install stove – Modified top drawer under stove by trimming off 3 / 4 inch and notching the back of the drawer around the gas line so that draw was still usable.
Install faucet and hands free control
Install dishwasher
Install garbage disposal
Install trim on lower edge of wall cabinets – cut edges of defective doors to use as cabinet trim.
Install under cabinet lighting - These would be the final 5 lights of a total 17 lights in the kitchen. Fortunately both of use like a lot of light.
Install drawer and cabinet pulls – Make wood jigs so that the pulls end up in the same place on all of the drawers and cabinets. Just an interesting note, we bought European (metric) sized pulls and the US company kept sending up English size screws. My wife eventually ordered screws separately from the Haffele catalog.
Install tile – This was very laborious. It took 5 days to do the two walls. Two things made it even more difficult. First, setting tiles on a 45 degree orientation makes one put tiles in stacked on a 45 slope. So as one places the tiles, they tend to want to slide down the 45 degree slope. Also, we have small inlays every other tile. And finally, we put in a lot of outlets to cut around. I had previously purchased a wet tile saw for about $300. These cuts are not possible using a score and break type of tile cutter.
Install icemaker – Not done yet (is a renovation every truly finished?)
Some of the things that I really like that are not always found in this level of renovations are the hands free faucet and garbage can drawer. The step stool is really nice for when our 3 year old daughter want to help in the kitchen. It is easily accessible and does not take up cabinet space.
Some of the other features that definitely are useful are full extention drawer slides, the drawers for pots and pans, and the EZ reach corner wall cabinet.
The curve on the granite peninsula end really looks nice and adds a level of sophistication to the kitchen.
The Pella window has an integrated mini-blind that is between the glass. This makes keeping it clean in the kitchen environment much easier.
My wife says no one will get this far. However, if you do, I hope this was helpful.
RE: joynserf's finished kitchen
- Posted by: janemarie5 (My Page) on Wed, Mar 24, 04 at 6:21
| What a beautiful kitchen!! I am very interested in how you did the bottom drawers. How did you go about doing that? Did you order spare drawers from manufacture with the glides? How did install go? I really think this might be a solution to my problem as I didn't get enough drawers for my kitchen. Thanks for any input. |
RE: joynserf's finished kitchen
- Posted by: Monicakm (My Page) on Wed, Mar 24, 04 at 6:30
| I did! I got all the way to the bottom :) What a WONDERFUL kitchen! All your hard work and research has paid off big time! How do you like the Tapmaster? Isn't it just the greatest thing :) I love your big wide drawer under the cooktop. The hands free trashcan opener...cleaver, cleaver, claver! It's all very nice and I know you'll enjoy it for many many years :) Monica |
RE: joynserf's finished kitchen
- Posted by: KirstenWI (My Page) on Wed, Mar 24, 04 at 6:38
| What a beautiful kitchen! Your photographs are excellent. And count your blessings to have such a handy and clever husband!! Kirsten |
RE: joynserf's finished kitchen
- Posted by: ShelleyFL (My Page) on Wed, Mar 24, 04 at 6:40
| Beautiful kitchen! You must have so much pride in it knowing DH did it himself. What a talented husband! You have great taste in your selections. You guys make a great team! CONGRATULATIONS! |
RE: joynserf's finished kitchen
- Posted by: riverrat1 (My Page) on Wed, Mar 24, 04 at 7:19
| Very nice! Congratulations on a job well done. |
RE: joynserf's finished kitchen
- Posted by: MickeyJ2 (My Page) on Wed, Mar 24, 04 at 7:37
| Yep, I read EVERY word! Is DH available to come help me?? I see you are just a couple of states north of us! Or is he totally exhausted? I do have a serious question! I see you ran your cabinets to the ceiling. They look like they are framed with full-overlay doors (maybe?). 8 ft. ceiling? You have no crown mold. I like the look without it, but are you not able to use a crown with the over-lay doors? Too close to the ceiling? This is a concern I am having. We ordered the crown mold but now I'm thinking we may not be able to use it since we ordered framed 42" uppers with full-overlay doors. After seeing yours, though, I may not WANT to use it! Fabulous kitchen...what a team effort. Enjoy!! |
RE: joynserf's finished kitchen
- Posted by: legallin (My Page) on Wed, Mar 24, 04 at 7:59
| Wow! It is beautiful. And, I can't believe how much you got for your money. DH did an amazing job -- he should go into the kitchen business. It looks like one of the most functional kitchens I've seen. Linda |
RE: joynserf's finished kitchen
- Posted by: Elizabeth_B (My Page) on Wed, Mar 24, 04 at 8:56
| Amazing!!!! What a beautiful kitchen you have created. I love the step stool ~ I have to find out if it is too late for me to add that (I think it may be). DH ~ I did make it to the end and read every word. I have even filed some things away for when I get to that point. Elizabeth |
RE: joynserf's finished kitchen
- Posted by: bernice44 (My Page) on Wed, Mar 24, 04 at 8:58
| Gorgeous!!, I love how you managed on the budget. Love the extras, toe kick drawers and Speakers on the deck. I don't know if 6 mos without a kitchen would work for me but considering the savings... You are both an inspiration. Enjoy your new space with pride. |
RE: joynserf's finished kitchen
- Posted by: littlebitofheaven (My Page) on Wed, Mar 24, 04 at 9:13
| VERY nice kitchen!! Congrats on a job well done and mostly DIY. Very impressive and inspirational. |
RE: joynserf's finished kitchen
- Posted by: LilaThabit (My Page) on Wed, Mar 24, 04 at 10:09
| Wowee wow wow. I can't believe it was mostly DIY. Congratulations guys on a GORGEOUS kitchen! |
RE: joynserf's finished kitchen
- Posted by: Paloma2001 (My Page) on Wed, Mar 24, 04 at 11:23
| Wow! This needs to go in the budget kitchens thread. Shows what a little (lot!) of elbow grease gets you. And I LOVE the backsplash! Can we clone your DH? Pal |
RE: joynserf's finished kitchen
- Posted by: young5344 (My Page) on Wed, Mar 24, 04 at 13:30
| Beautiful. You should be very proud. Thanks so much for your detailed info. |
RE: joynserf's finished kitchen
- Posted by: femmelady (My Page) on Wed, Mar 24, 04 at 13:35
| What a great kitchen! Those blue pendant lights are wonderful, and I would guess play really well with the verde butterfly granite. It looks like you might have quite a bit of gold in it too. Always harder to tell in photos. They never give that gorgeous granite the justice it deserves! Thanks for all the "opened" photos. I think it helps to see the inside as well as the out. You should be very proud!! You have a wonderful and well functioning kitchen. Enjoy! |
RE: joynserf's finished kitchen
- Posted by: TexasGal5 (My Page) on Wed, Mar 24, 04 at 17:04
| Oh I am SO jealous of the usable space under your cooktop!! Your kitchen is so beautiful...I love the cabinets! |
RE: joynserf's finished kitchen
- Posted by: knroberts (My Page) on Wed, Mar 24, 04 at 21:11
| Fabulous kitchen with so many storage solutions. It's very impressive and I can only imagine that a DIY or an exceptional GC would tolerate that level of detail. You should be so proud of doing a great job. Enjoy! Karen |
RE: joynserf's finished kitchen
- Posted by: Motherof3Sons (My Page) on Wed, Mar 24, 04 at 21:32
| Great kitchen with lots and lots of storage. You used every inch of space. You are couple that obviously can work together. Congratulations on a job well done! |
RE: joynserf's finished kitchen
- Posted by: compumom (My Page) on Thu, Mar 25, 04 at 0:14
| What a great kitchen, hard to believe it was a DIY on that budget. You used good planning for storage, it was well thoughtout. I wish I worked as hard on the pull-outs etc. |
RE: joynserf's finished kitchen
- Posted by: joynserf (My Page) on Thu, Mar 25, 04 at 0:21
| Thanks for all of the complimentary posts. It was a lot of work and I appreciate the positive feedback (DH). Janemarie5 ************************************************* These were installed prior to installing the cabinets. There was a magazine article about 6-14 months ago that discussed how one person did a retro fit. I think is was Handyman and I will look for it. It could have been This Old House or Fine Woodworking. It has pictures that would help. His method lost a time bit more height in an already very short space. They had to build a three sided box to mount the drawer into. Then the three sided box and drawer were slid under the cabinet. In my case, Joy ordered Hafele Accuride full suspension ,side mount, with 1 inch over-travel slides. They were 16" slides that extend out 17 inches to allow for almost clearing the toe kick overhang. The slides need to fit in the under cabinet depth which loses the toe kick set back and the back of the cabinet thickness. I turned the cabinets upside down and carefully removed the front of the toe kick. This needs to be reinstalled on the front of the draw to retain the same finish. I build a drawer box that was carefully measured to be the width of the area beneath the cabinet less the thickness of the slides. You may want to trim this by about another 1 / 8 of an inch. If the drawer is too wide with the slides then you are screwed because it won’t fit and if you force it, it won’t slide smoothly. On the other hand, if it is a little too small, you can shim the slide out with a thin wood space. In building the box, it is critical the left and right sides are parallel or else the drawer will not slide well. The depth was close to the maximum depth such that the front of my drawer box aligned with the back of where the toe kick front was originally located. When I set the slide location I put it about 1 /8 of an inch back so that the self closing slides would pull the toe kick front snugly into its original location. The box was constructed from pine. The box sides and back were cut and sanded. Then I used a table saw to cut just wider than 1 / 8 inch grove near the inside bottom of each side and front and back piece. Cut was about 1/3 depth of wood thickness. I then cut a 1 / 8 thick piece of oak faced plywood. This was slid into the grove for the bottom of the draw. You could cut the grove with a circular saw or router, but the table saw was easiest. I then used a biscuit joiner to cut notches into the corners to insert biscuits and glued the sides and back together. Biscuits are flat football shaped wood pieces inserted half into each piece of wood to be joined. Glue is applied to the notches, biscuit inserted, wood pieces clamped together and allowed to dry. For additional joint strength, I also notched the corners to increase the contact area for the glue. Again used table saw but could do with circular or router. I did not dovetail the joints because I don’t own the proper template (if that is what it is called). I then mounted the draw, less the toe kick front. This was to ensure the draw operated smoothly and did not drag the front when fully extended. So it is important to make sure the slides are level or maybe even slightly tilted up. When the drawer has more weight it may sag in the front so it must be mounted high enough to prevent dragging. The actual height of the box does not need to be the maximum since most things put into our draw are flat and will not fall over the sides. Finally, need to trim the toe kick shorter (height wise) so it does not drag either. It was originally installed from floor to top of toe kick space so it is too tall to mount as the drawer front and still allow opening the draw without dragging. After trimming, mount it to the front of the draw. Then install a handle. Now for those who don’t have biscuit joiners, Handyman Feb 2003 page 23 describes an inexpensive pocket hole jig tool that allows for screwing the draw together. The screws would be on the back of the draw and one the front. The front is then covered with the toe kick panel. Thus no screws show. Monicakm *************************************************** We like the tapmaster although we now are kicking toe kicks whenever we want water to come out of a faucet. And it really confuses people who do not know we have it. I have noticed water flow is a little low and that may be due to restrictions put into the Grohe faucet (per my wife’s research). Just have not had a chance to look at it. Mickeyj2 *************************************************** We have full overlay doors. The ceiling is 8 foot. We do not have crown molding. We were attempting to maximize storage space and wanted the 42 inch tall wall cabinets. At the same time one wants to maintain sufficient space between lower cabinets and wall cabinets. In addition our lower cabinets sit on top of the wood floor that covers the entire room (including under the counters). We also used damaged doors to make molding along the lower edge of the wall cabinets to hide the under counter lights. Using the cabinet doors guaranteed that the color and edging matched. The final space between counter and wall cabinets with molding was 17 inches. In addition, one needs to plan on some loss from the 8 feet for floors and ceilings that are not level. The lower cabinets need to set level to the highest point on the floor under the cabinets. While the wall cabinets need to be set level to the lowest point on the ceiling over the cabinets. For us the floor was off about 1 / 2 inch and the ceiling about 1 inch. We still plan on putting some small trim above the cabinets to cover the varying width gap between cabinet top and ceiling. Note, this gap is not particularly noticeable. And if we had the space, we would probably put in crown molding, but we don’t. Elizabeth b************************************************ The step stool is easy to retro fit, since it does not mount to the cabinet in any way. You need to have a cabinet that it fits under. Note you need some clearance between the cabinet sides to get it to roll easily. Our cabinet was 18 inches wide outside dimension. Carefully pry off toekick. Trim to be shorter in height. Attach to the front of the step stool, add a handle, and slide in. Note, due to how Kraftmaid constructed the toekick area I had to make a minor modification. Under the cabinet behind the toekick there were some support blocks on the inside that supported the bottom of the cabinet. These narrowed the width about halfway back. So I cut thin wedge shapes and attached it to the insides of the cabinet sides to direct the stool to the center of the cabinet (left right center) as it is rolled in. |
RE: joynserf's finished kitchen
- Posted by: elsieCat (My Page) on Thu, Mar 25, 04 at 1:06
| Printing your posts out--what incredible generosity and energy after such protracted labor... BEAUTIFUL! And it's a labor of love that both of you created together! I'm in awe of how you took lemons and made molding and a microwave shelf out of them :) Completely inspiring, both of your writings will be revisited frequently. A masterful example of why this forum is ***so great***. |
RE: joynserf's finished kitchen
- Posted by: Merjan (My Page) on Thu, Mar 25, 04 at 12:02
| GORGEOUS kitchen! Congratulations on a job well done.... you could tell that you guys put a lot of thought and effort into this project. Our granite, our floors, and layout are identical :) |
RE: joynserf's finished kitchen
- Posted by: bwjones (My Page) on Thu, Mar 25, 04 at 12:18
| I love it! Thanks for detailing what you did. Enjoy your new space. |
RE: joynserf's finished kitchen
- Posted by: SDchica (My Page) on Thu, Mar 25, 04 at 16:22
| CONGRATULATIONS! What a wonderful inspiration to those of us who plan to DIY. This also renews my enthusiasm after a few weeks of inactivity (we completed the demo and then my husband was pulled into a nasty project that has taken his weekends for the past month or more) - after seeing yours, I know it will ultimately be worth the wait. I enjoyed seeing all of your ingenious little tricks for maximizing space. I've been frantically cumulating these sorts of tricks for over a year (we've already planned toekick drawers and the tapmaster). And my DH will likely read through your DH's entries to learn as well. Hmm, we'll have to take another look and see what brilliant ideas I can blatantly steal . . . thanks so much! |
RE: joynserf's finished kitchen
- Posted by: MickeyJ2 (My Page) on Thu, Mar 25, 04 at 17:25
| Thanks, Joy, for your reply. I was afraid my question had become imbedded in all of your compliments. And they are well deserved compliments, BTW, as you and DH did a fantastic job! I understand exactly what you said. We discussed lowering the uppers to accomodate the crown mold but I'm concerned now about the space between the upper and base cabinets (which will also sit on a wood floor). And I didn't even THINK about a molding to hide the undercabinet lights. So I will pay careful attention to these things when the install begins. Continue enjoying that GORGEOUS kitchen!! |
RE: Finished Kitchens - Pic Links Only, no responses please
| We’ve been at it for a year now. Demolition started during the blizzard of 2003. Gutted everything and tore down a wall. I can say that it’s 99% done. All DIY except wood floors which we had a friend’s floor guy put in and the brickwork involved in closing in the exterior door in the kitchen. The total cost of the renovation is close to 22K. Here’s the spec: Kraftmaid Piermont Cathedral Honey Spice Maple from HD with all full-extension drawers and APC (All Plywood Construction) Neat Features learned only from this GREAT forum: Tapmaster – hands-free faucet activation Made DH build the trashcan pullout and the toekick drawers after hearing about it from here. He wasn’t too happy that I came up with more work for him and told me not to read the forum but now he’s thrill with it and shows it off whenever possible. We used the Accuride drawer slides with overtravel. These are some great slides. Incidentally, these slides are also from Hafele. They do have some great products. Neat feature that didn’t get incorporated: Plugmold - Found out about it too late and DH was not about to redo all the electrical again. Neat Ideas for extra doors/parts for the cabinets due to bad workmanship: Cut the edge of the doors and use it for moulding for the bottom of the wall cabinets, which keeps the undercabinet lights from view. |
Here is a link that might be useful: joynserf's kitchen
- posted by starpooh @ 9:35 PM

Post a Comment